

How To Repair A Finger On A Cement Garden Hand
How to Terminate Concrete
Techniques for making a smooth, durable finish on a concrete surface.
![]() Time
Time
A total 24-hour interval
![]() Complication
Complication
Intermediate
![]() Cost
Cost
$51–100
Introduction
In this article, we'll show you the tools and techniques you need to go a smoothen, durable cease on concrete. We'll also tell you how to know when the concrete is prepare for each phase of the finishing process. Whether you lot're pouring a minor slap of concrete, similar a pad for your garbage can, or a large slab for a patio, these DIY steps volition guide you through the procedure.
Tools Required
Finishing physical
Close-upwards: Darby

A darby flattens the moisture concrete.
Close up: Edging tool

An edging tool gives the concrete a round edge.
Close-up: Groover

A groover makes joints in the concrete to control cracking.
Close-up: Magnesium physical hand bladder

A bladder compacts the concrete surface, giving it a smooth look. Putting a smoothen, durable end on concrete is a skill you lot can just master with the proper set up of tools and practice. Nosotros'll show you the tools and how to use them for each step of the concrete finishing process. And equally important, we'll assistance you make up one's mind when the concrete is ready for the next finishing stride.
Merely yous actually can't practice these techniques except on real concrete. Then information technology'southward smart to start with a small-scale project like this garbage can pad. When you get the hang of information technology, you tin can move up to a larger slab. But keep in listen that finishing larger slabs (more than than about 100 sq. ft.) is trickier because the concrete may set up too fast.
In this article, we'll show you how to level the concrete in the forms, round over the edges and make a progressively smoother end. But nosotros won't show how to build forms or make full them with concrete.
Each step in the process requires a unlike tool. You lot tin can brand the screed (Photo 1) and darby (Photo 2) from scraps of wood. The rest you'll have to hire or purchase. You'll need a magnesium float ($15 to $25), an edger ($5 to $20), a grooving tool ($x to $30) and a steel trowel ($8 to $40). Pros buy expensive top-quality tools that will stand upwardly to the rigors of daily use, simply less expensive versions are available at domicile centers and hardware stores and will piece of work fine for occasional home use.
Physical is a blend of Portland cement, sand, aggregate (gravel) and h2o that harden when mixed. While there are additives that can tedious down or speed upwardly the process, and special bagged mixes that set fast, in general, the speed of the process largely depends on the temperature and humidity.
Hot, dry weather accelerates the hardening process, sometimes then much that it's near incommunicable to consummate all the finishing steps in fourth dimension. Work while your projection is in shade if possible. On cool days, you may spend a lot of time waiting for the concrete to reach the next stage. That's why nosotros tin't give you lot exact waiting times. Simply we'll show y'all how to tell when the concrete is ready for each finishing pace.
Video: How to Cascade a Concrete Slab
Project pace-by-step (viii)
Step 1
Screed and darby the concrete correct away
Screed the physical
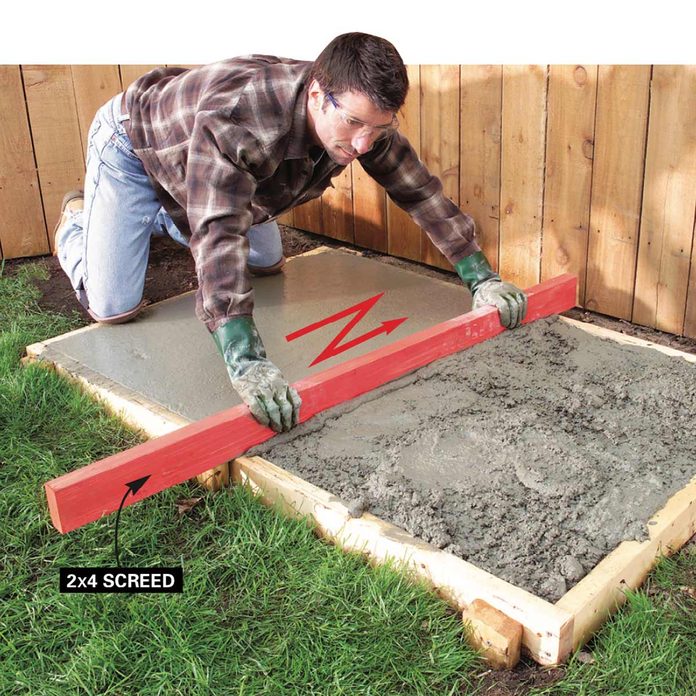
Push or pull the screed lath across the forms with a back-and-along sawing motion. Shove concrete into depression spots in forepart of the screed board. Repeat to remove excess physical.
Grade and Cascade a Concrete Slab
Pace 2
Darby the physical
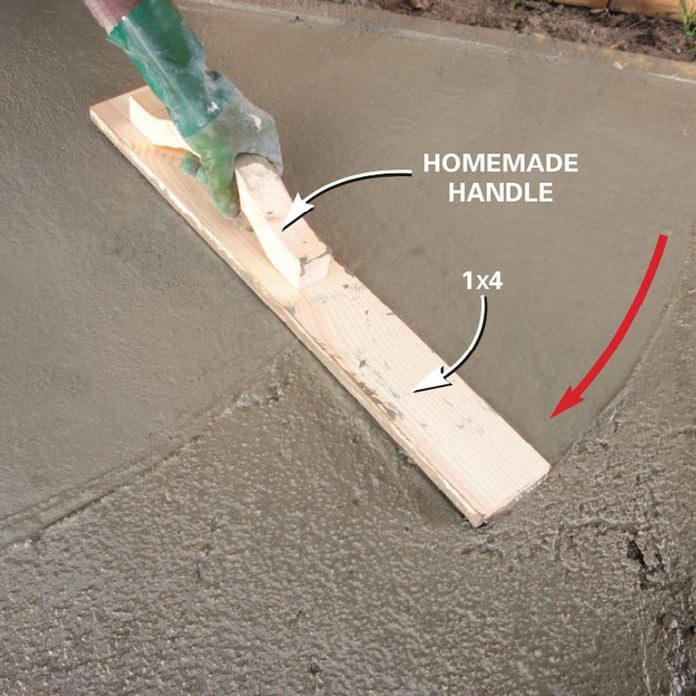
Sweep the darby across the concrete in overlapping arcs to flatten the surface, push down lumps and fill up voids. Lift the leading edge slightly but go along the darby level with the surface. Make ii passes.
How to Cascade a Concrete Slab Successfully: 31 Tips
![]()
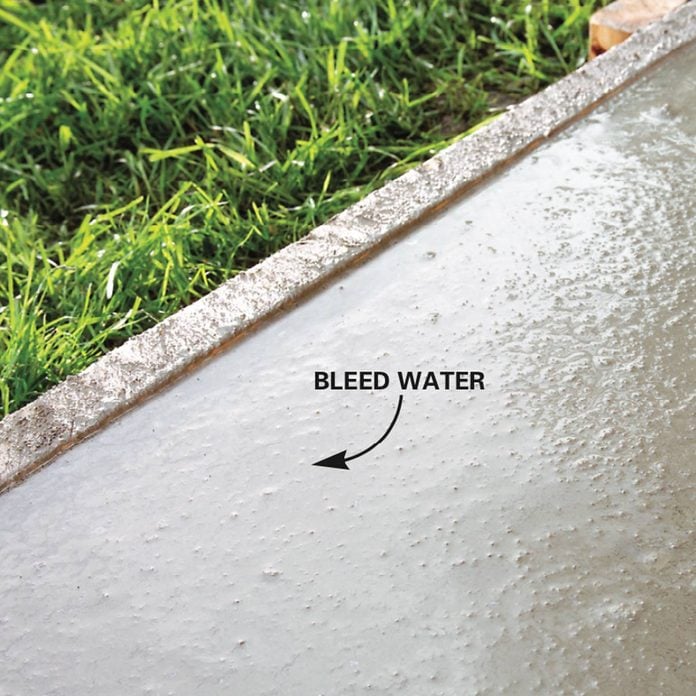
Step 3
Wait for the surface water to disappear
H2o will appear on the surface. Look until this "bleed" water and sheen disappear entirely before edging, jointing or floating the concrete. Screeding levels the concrete with the peak of the forms and begins the process of forcing the larger aggregate below the surface. Use any 2x4 that overlaps the forms by at least 6 in., merely make sure it's straight (Photo 1).
Follow screeding immediately with the darby (Photo two). Your goal is to level out marks and fill modest holes left by screeding. In the process, you'll force larger amass down, leaving a slurry of cement and sand to fill the surface.
The darby should be big enough to reach a little more than halfway across the slab. Brand a darby by screwing a handle (we cut a 2x4 with a jigsaw to make a handle) onto a straight piece of 1x4. Longer darbies may require 2 handles for better control. If you tin't accomplish the entire slab from the edges with a darby, rent a bull float and handle to apply instead. Two passes over the surface with the darby are enough. Overworking the concrete will draw too much cement and fine sand to the tiptop and create a weak surface.
Drilling Concrete and Installing Fasteners
Step 4
Edge, groove and float the slab when the sheen is gone
Edge the concrete
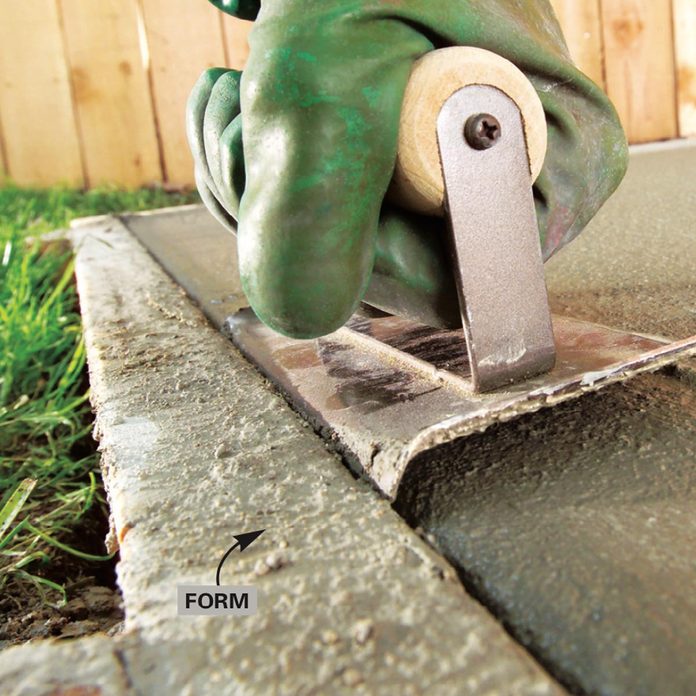
Work the edging tool back and forth, using the edge of the form equally a guide. Lift the leading border slightly. Employ long strokes, working the amass back until you lot have smooth, round edges.
Stride 5
Create grooves in the concrete
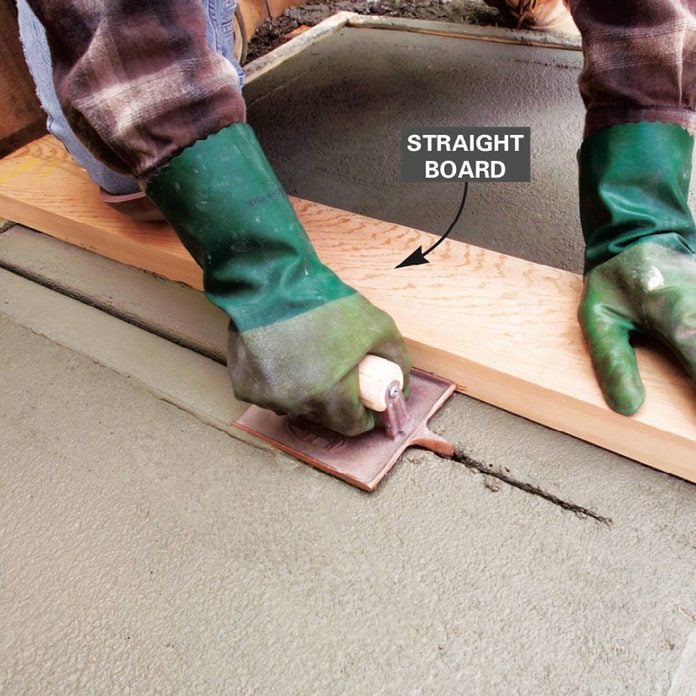
Set a directly board forth predetermined marks for control joints. Run the groover dorsum and forth against the straightedge until the bed of the tool is riding on the concrete surface. After smoothing the slab with the darby, water volition "bleed" out of the physical and sit on the surface (Photo iii). This is temporary. It'll shortly reabsorb into the concrete. Yet, information technology's critical to look until information technology disappears.
Working the concrete before the surface "drain" water disappears will weaken the surface of the slab when it dries. When all traces of the water are gone and the physical starts to harden, yous can resume finishing activities. Test by pressing your gloved thumb onto the surface nearly the perimeter. The concrete is gear up when pressing difficult only leaves a 1/4-in. deep impression.
Outset past running the edger around the perimeter to circular and meaty the corner (Photo 4). Sometimes it's a picayune tough at beginning equally you push larger amass back into the physical and round over the edge. If the edger is leaving a path deeper than near 1/8 in., wait for the concrete to set a little longer and apply less downwardly pressure.
Next divide the slab into equal parts with a straightedge and groover (Photo v). Sidewalks and small-scale slabs need grooves nigh every 4 ft. Add grooves every x or 12 ft. on driveways and garage slabs. Dividing slabs with grooves looks nice, but the existent reason is to control smashing. Drying and soil motility cause physical to fissure. The groove creates a weakened spot for the crack to form where it won't be seen. To be constructive, the groove must be at least one-fourth the depth of the slab.
Step 6
Float and trowel the surface to smoothen and compact it
Float the physical
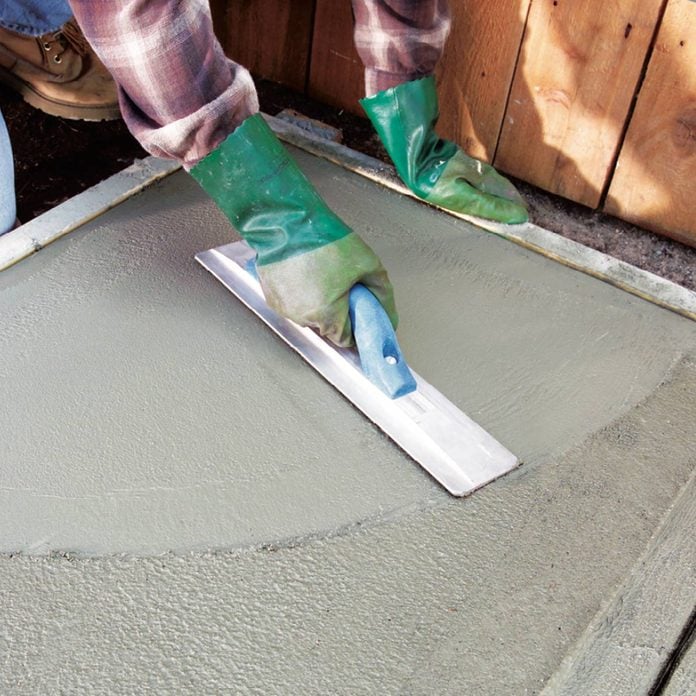
Elevator the leading edge slightly while you sweep the magnesium concrete hand float over the concrete in large arcs to meaty the surface. Blend in the marks left by the edges of the edger and groover.
How to Remove and Replace a Small Concrete Entry Pad
Stride 7
Trowel the surface
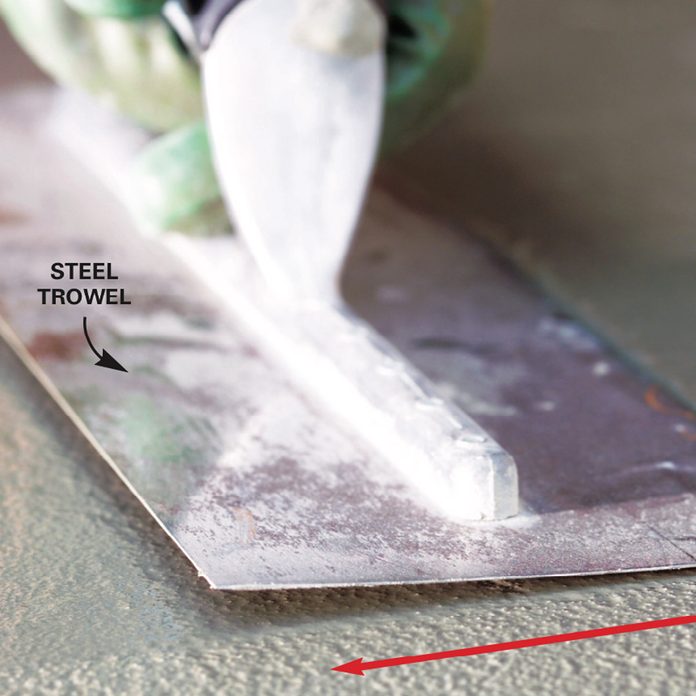
Smooth the surface with a steel trowel after it's partially hardened. Hold the trowel most apartment and swing it in large overlapping arcs while applying pressure. Float the physical when y'all're done grooving and edging (Photo six). Floating removes the marks left past edging and brings the surface i step closer to a final finish. You lot may have to bear down on the float if the concrete is starting to harden. You'll be surprised that with plenty scrubbing you'll be able to bring a slurry to the surface of even a fairly hard slab. If you're happy with the look of your floated slab, yous don't need to practice any more finishing. Repeat the edging and grooving steps after floating and after troweling to refine the groove and edges. For a decorative border effect like to what'due south shown in the inset to Photo 4, run the edger around each section of slab afterward a final broom stop.
In Photograph vii, we bear witness how to put an fifty-fifty, smooth terminate on the slab with a steel trowel. Troweling is one of the trickier steps in physical finishing. You'll have to practice to develop a feel for information technology. For a really polish finish, repeat the troweling footstep two or three times, letting the concrete harden a bit betwixt each pass. At first, hold the trowel almost flat, elevating the leading edge simply plenty to avert gouging the surface. On each successive pass, lift the leading border of the trowel a footling more than. If you want a rougher, non-sideslip surface, you can skip this step and do a broom stop (Photo eight). Likewise, if you social club air-entrained concrete delivered, don't trowel the surface.
How to Properly Mix Concrete
Step 8
Broom finish for better ground
Create a not-slip surface
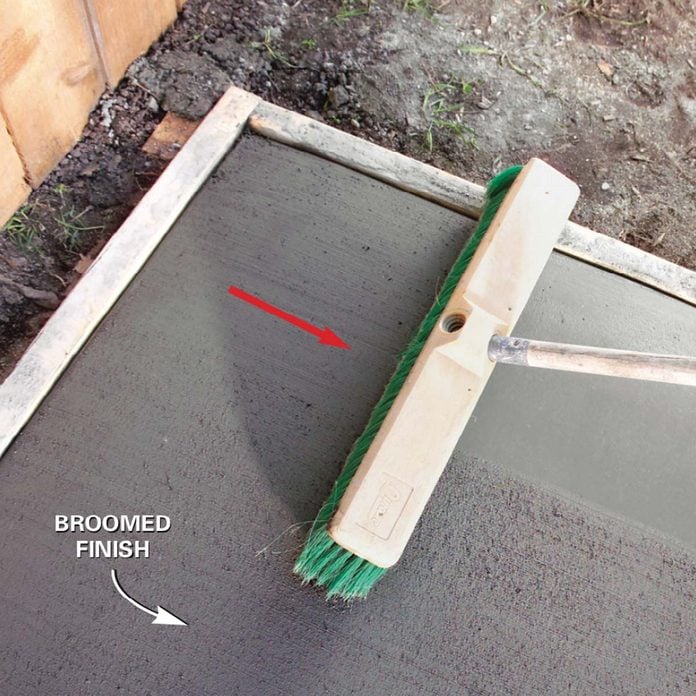
Drag a broom beyond the concrete after floating it with the magnesium float to create a non-slip surface. Adjust the downwardly pressure to create the desired amount of texture. Dragging a broom beyond partially hardened concrete leaves a crude texture that gives meliorate traction in glace weather (Photo 8). Special concrete brooms are bachelor, only a regular push broom will work too.
Remember to wash off the bristles every bit soon every bit you terminate brooming concrete. As with all the other finishing steps, the key to a successful broom finish is to expect until the concrete surface is just right. If concrete starts to pile up in front of the bristles as you lot drag the broom beyond, resmooth the broomed area with a float or trowel and then await a little longer before trying once more.
When you're done finishing the concrete, encompass it with plastic or keep it moist by sprinkling information technology several times a mean solar day for most a week. This slows the curing process and results in a stronger, more durable slab.
Circumspection!
It might exist hard to believe that concrete tin can exist dangerous. Only the potent alkalinity of cement tin can cause chemic burns just similar a strong acid. By the time you realize you lot're being burned, you may already take peel impairment. That'due south why it's essential to forbid prolonged pare exposure to moisture concrete. And why y'all should exist actress careful to go on wet concrete from getting in your optics. Wearable prophylactic gloves, a long-sleeve shirt, long pants and prophylactic glasses. Wear rubber boots if yous'll be wading in physical. Rinse wet concrete from your skin immediately and remove wearing apparel that accept go saturated with physical.
Originally Published: September 24, 2022

Source: https://www.familyhandyman.com/project/how-to-finish-concrete/
Posted by: lauriawhissely.blogspot.com
0 Response to "How To Repair A Finger On A Cement Garden Hand"
Post a Comment